| [E-mail] | |||
Last month, I started the series by giving overviews of my previous tanks. In this episode, we delve into the gritty details of getting the tank and building a stand and light hood for it.
For some, the whole process of purchasing a big tank can be like buying a house. In the past, I've gone to every store in the city with a clipboard and tape measure, making sure to find out what sizes are available, which stores will be able to special-order one, and how much it will cost. On the other hand, I've also just gone and bought tanks used and dealt with the size later. My previous tank, the so-called ``Almost Affordable Aquarium'' (AAA), was bought using the latter method. Hey, 4 feet, 55 gallons, the guy said. A 4-foot long tank is a 4-foot long tank, right? Wrong!
 Top view comparing planting area of two tanks.
|
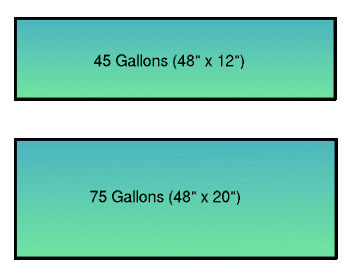
Most tanks are designed to maximize the area of the front glass relative to the surface area (so-called ``footprint'') so you can have a larger display with minimal water, the fish are always up close to the glass, and the back of the tank is still visible in murky water. You can still find some of the ridiculous extremes of this as ``Extra Tall'' tanks. Unfortunately, these small footprints are difficult to aquascape. The AAA tank was only 12 inches front-to-back, which is not much more than a 10-gallon aquarium! When fully planted, it had a tendency to look overpacked, almost like a store tank with plants for sale.
Now, older and perhaps a little wiser, I looked to maximize the footprint instead of the front glass. I wanted to have lots of different sized plants layered in from the front to the back, large pieces of bogwood, and open spaces for the fish to swim. In addition to the extra aquascaping, a big footprint meant a larger surface area of water to exchange oxygen, so I could hold more fish for the same front view.
So off I went to every store, trying to decide which tank. Acrylic or glass? 75? 80? 90? 100 gallon? My friends were all convincing me to get a 100-gallon tank, but dimensionally a 75 looked nicer to me. Don't ask me why, maybe it's just the aspect ratio; the 75 is 18 inches deep and 20 inches tall, kind of a sawed-off 100. A 90-gallon tank has the same footprint, but is a couple inches taller; I think it was good I didn't get the 90, as I just barely avoid soaking my armpits in the 75 when I reach in to clean the every week.
I ended up buying glass because I wanted to have the option of making it an open-top tank and glass is easier to clean (for me, at least). Turns out to be cheaper too, even at this large size. The downside is that glass is also heavier, and it requires a more carefully-built stand.
A lesson I've learned from the past is that it's very easy to go overboard on stand construction, especially when building a full-blown cabinet. I spent $150 on wood for one such project, and was sorely disappointed when trying to sell it later. Every time I've built something since, I've either made it cheaply or resigned myself to keeping it forever. :) My new stand has a little of both.
This section has the potential of sounding like it comes right from Bob Vila, so I suppose a few illustrations are in order to keep everyone from dozing.
![[Diagram of tank stand]](stand.gif)
I built the basic stand using a 2x4 frame design I've been using for several years, enhancing it into a cabinet with appearance wood and plywood doors. First two ``picture frames'' of 48" x 20" were constructed for the bottom and top. I like this design because it spreads out the pressure on the floor as well as the tank. In previous tanks, I've tried mitering the endpieces and joining with them with corrugated screws, but ended up having to use extra wood braces to secure everything. When I took the old tank out, its stand was not holding up nearly as well as I'd hoped. So for this stand, I used ``end lap'' joints, which are extremely strong.
![[Diagram of Lap Joint]](lap.gif) End lap joint, used for securing both the bottom and the top ``frame'' of the stand. |
To hold the top and bottom frames to the support struts, a 3/4" x 3/4" groove was routed out around the edge of each frame. Similar grooves were routed into both ends of the 2-foot 2x4 pieces that hold the stand up. These fit into the frames like an interlocking puzzle (I think they're called rabbet joints), leaving a frame that's not particularly easy to collapse.
![[Diagram of Rabbet Joint]](rabbet.gif) Rabbet joint, used to connect the side beams to the top and bottom of the stand. |
Because I don't have a table saw, it took me forever to get those rabbet and lap joints made. With so much wood to remove, router work is very slow and very messy. My kitchen (err, sorry, ``workshop'') was completely coated in wood particles for weeks afterwards! I still think it was worth it, though.
Once the basic frame was finished, it looked like the frame of a small house. It needed to be spiffed-up! For the sides, I inset some pieces of rounded-over 3/4'' thick appearance pine (which conveniently fits into that 3/4'' routed groove). And for the front, which is what most people see, I must confess here's where I went a little overboard, building some maple doors, complete with veneered edges and even those hinges where you have to drill a 1-1/4'' hole with a Forstner bit (what the heck's a Forstner bit? It's expensive, that's what. And requires you own a drill press or some other guide to make perfectly angled holes. $$$ Ch-ching! But hey, I'm set for when I decide to make our kitchen cabinets when we buy a house).
I stained the whole thing with some light dutch oil-based stuff from some company that's gone out of business, and then put on several coats of Varathane Diamond Finish. This stuff's basically plastic, perfect for stands and hoods that are always in danger of getting wet.
I've been very happy with hanging light fixtures, which I tried first with the AAA. The light can be retracted several inches above the tank during the summer to let more natural light in, and plants can grow out the (open) top. When cleaning the tank, I can retract the light up a few feet and still see everything; this is real nice for re-arranging plants.
My original fixture in the AAA tank was pretty simple: two shoplights screwed into a piece of plywood. Functional, even if not the most elegant-looking. In keeping with the theme of the new tank, I wanted elegant this time, so I built a lightweight hood out of maple plywood to match the doors on the cabinet. The front piece is held by a piano hinge, allowing it to be flipped open for feeding. The outside was finished similarly to the stand.

While the hood's outside was designed to look nice, the inside is a different beast. It's a shame how so many lighting fixtures seem to be constructed these days... black acrylic and square, wood and square... the operatives being dark and square. Light just falls in, trapped forever! My hood is trapezoid-shaped in order to reflect a maximum amount of light into the tank. Two small 1x2'' reinforcing struts also function as partial reflectors. The entire inside is painted white. White paint is a very good reflector, one of the best. It reflects something like 95% of incident light, far better than unpainted metal. I could go into a whole discussion of reflectivity here, but I'll spare you; suffice it to say that only two other materials are better: aluminized mylar, and silverized teflon; I might actually coat it with mylar some day.
Next: we get out of cabinetry and into details on lighting...
|
|
This page was last updated 29 October 1998 | ||