| [E-mail] | |||
All a skimmer consists of is a column of flowing water, some sort of bubble generation, and a collection cap to catch and hold the dissolved organic particles in the water. There are two type of skimmers, classified by their bubble generation method: air driven and venturi. Air driven models use an air pump and airstone to bubble air into the water. Venturi models use the Bernoulli effect to generate bubbles in the water. Air driven models are cheaper, but require more maintenance than their venturi counterparts. Venturi models are more expensive to purchase and have a higher daily operating cost (they require powerful pumps for the best results), but are generally more efficient than air driven models (more bang for the buck as it were).
I have no direct experience in building venturi skimmers, so it will be left to the reader as exercise to investigate their construction. The following section will concentrate on counter current air driven protein skimmers.

Figure 3.2.0 - Counter Current Air Driven Protein Skimmer
The length of the reaction tube is some what arbitrary, but one too small or too long will not function properly. Sizes range from 20" to about 48". The reaction tube, collection cup and airstone cover are constructed from acrylic tube, and the rest is made of PVC and acrylic plating.
The disadvantage of using acrylic tubing is that it is considerably more expensive than PCV. Also, the largest extruded tube comes in 2 3/4 inch diameter, after that the prices goes way up. The whole design could be constructed from PVC, but then you couldn't see into it and marvel over the amazing bubbles :-).
	30" x 2 3/4" ID tube
	3"  x 2 3/4" ID tube
	3"  x 1 1/4" ID tube
	3"  x 1 1/2" ID tube
	1 1/2" x 1 1/2" ID tube.
	3 - 4" x 4" plates of acrylic
	1 - 6" x 6" plate of acrylic
	2 - 1 1/2" x 1/2" PVC pipe
The acrylic tube should be 1/8" thickness and the acrylic plates should be at least 1/8" thickness. The 6" x 6" plate will be the base of the unit and the other plates will act as the separators.
You will need miscellaneous power/hand tools and some PVC/vinyl tubing. Specifically, you will need one PVC elbow, about six feet of 3/16" vinyl tubing and about 6 feet of 7/8" inner diameter vinyl tubing. The large vinyl tubing will fit over the PVC pipes and supply/return the water. The elbow will be connect to the outlet pipe (the one on the bottom) to feed the water upward. You could skip the elbow and use flexible tubing, but for $.34 it's worth it. As another note, PVC and CPVC pipe, for a given inner diameter, have a different outer diameter. So if you use 1/2" CPVC pipe, the same hose will not fit 1/2" PVC piping.
Assuming that all the pieces have been cut, sand all of the edges so they are flat and smooth. It is critical that the edges are flat to make a good seal and so it won't leak. After sanding the edges, start construction by drilling two holes in the 2 3/4" tubing. The holes should be 7/8" in diameter (1/2" PVC will fit nicely into the 7/8" holes). One hole should be about 1" from one end, and the other should be about 2" from the other end. Figure 3.2.0 shows this clearly. With the holes drilled, sand the holes to remove any large particles and insert one of the PVC pipes into the upper hole (the one 2" away from one end). Glue the pipe in place with aquarium safe cement (GOOP brand name is good). Don't use silicone sealant for this, the pipe has to be glued tightly to the tubing and sealant allows too much play in the joint. You can use sealant after the cement has dried to make the joint water tight if it makes you feel better.
While the cement is drying, take the last PVC pipe piece and glue it into the PVC elbow using PVC glue. Next, glue the elbow/pipe configuration to the lower PVC exit (the one 1" from one end), as shown in Figure 3.2.0. Set the reaction tube aside and allow the PVC pipes to dry into place (you can hold them with tape so they would move while curing).
Next comes the collection cap and airstone holder. Start by drilling a 1 1/2" hole into two of the 4" x 4" acrylic plates. The holes should be centered in the middle of the plates. One of the plates will serve as the bottom of the collection cap and the other will serve as the top of the reaction tube. Sand the holes to remove any large pieces of molten acrylic and any burrs.
Now take the 1 1/2" x 1 1/2" tube and the 3" x 1 1/4" tube and see if the smaller tube will fit inside the larger tube. Chances are that the smaller tube will have to be sanded down to fit into the large tube. If so, sand the smaller tube until it just fits inside the larger one. It should fit snugly, but not too tight as to make it difficult to pull out.
Next, take the 3" x 2 3/4" tube section and glue it to one of the 4" x 4" plates with a hole in it. Make sure the tube is centered with respect to the hole in the middle. Glue all the acrylic parts using acrylic specific glue. This makes by far the best joint and dries very quickly (the glue can be found at any plastics dealer, probably the same place where you will get the acrylic). You can use the cement for this, but acrylic glue is nicer to work with, plus it only costs about $10 for lot of glue. The final step in making the collection cup is to glue the 3" x 1 1/2" tube to the bottom plate of the collection cup. Use the acrylic glue to get an initial hold, and then apply a bit of cement to fill the holes and make the joint stronger (although the acrylic glue makes a pretty strong joint as it is). The 1 1/2" hole in the plate will be a bit larger than the pipe, so the acrylic glue may not be able to seal really well, hence the cement. The configuration of the collection cup is shown in Figure 3.2.1.
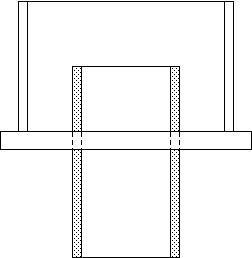
Figure 3.2.1 - Collection Cup Configuration
Next take the other plate with the hole in it and glue the 1 1/2" x 1 1/2" tube to the hole. This plate will be glued to the top of the reaction tube later on. Figure 3.2.2 shows the configuration of the reaction tube top with respect to the collection cup.
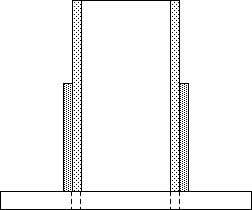
Figure 3.2.2 - Top of Reaction Chamber with Skimmer Cup Tube
To make the bottom of the skimmer, take the 6" x 6" plate and glue the 3" x 1 1/2" tube to it, centered in the middle of the plate. The airstone will be surrounded by this tube and prevent any bubbles from being pulled into the outlet hole.
The final step in the entire construction is to glue the top and bottom pieces to the reaction tube. After the PVC tubes have dried firmly in place, glue the bottom plate to the bottom of the reaction tube (end with the PVC 1" from the end). This is the most critical joint for leaks. A leak here will drain the entire skimmer's contents into the floor. Bond the bottom place with the acrylic glue and then seal it with the cement or silicone sealant. Next, using the acrylic glue, glue the top plate (the one with the tube glued to it) onto the top of the reaction tube. Take the last 4" x 4" plate and drill a 3/16" hole in the center. Feed the 36" tube through the hole and attach an airstone to the end. Take the collection cup and slide it into the top of the reaction tube (where you spent so much time making sure it would fit) and slide the airstone into the reaction tube placing it inside the holding tube at the bottom. Some airstones may not fit the 3/16" rigid hose, so a 3/16" flexible hose surrounded by a 5/16" rigid tune may serve as more functional in the long run.
Only thing left now is to attach the source and exit hoses and turn the system on. Operate the skimmer in a tub of some sort for the first few days to guard against any leaks. You will have to adjust the water level inside the skimmer for optimum foaming and bubbles. To do this, configure the outlet hose such that the outlet breaks off just below the inlet of the skimmer, as shown in figure 3.2.3. Adjust the exact level of the water to optimize the foam collection in the cup by moving the break off point up and down near the inlet level.
Most people recommend a T at the break off point. Leaving the top side of the T open to act as a siphon break and other two sides connected to the outlet piping, one coming from the skimmer, the other going to the return (most likely the sump of a W/D filter).
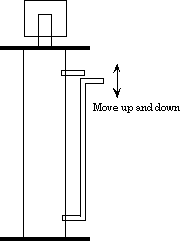
Figure 3.2.3 - Adjustment points
	2 3/4" ID tube (6' ft)	17.94
	1 1/4" ID tube (6' ft)	 9.78
	1 1/2" ID tube (6' ft)	 9.42
	Acrylic Plates  	 3.00
	1/2" PVC Pipe (10 ft) 	 1.20
	1/2" PVC elbow		 0.34
	7/8" ID hose (6 ft)	 5.50
	3/16" ID tubing 	 0.99
	Acrylic Glue 		13.00

	Total			61.17
A major price factor in the whole design is the acrylic tubing. Specifically, I could only find it in 6ft sections, so buying this amount will allow you to make 2 skimmers for the price of one. So if you have more than one tank or are going to expand in the future (and who doesn't want to) you will have more than enough materials left over to do it all again for free. Another benefit is the third and fourth skimmers will only need another 2 3/4" tube, possibly more acrylic plating, and PVC elbows. All in all, about 20 dollars worth of materials.
You could opt to skip the acrylic tubing and make the whole thing out of PVC piping. This would cut the price in half and still give you enough materials for two skimmers. Additionally, if you want a wider skimmer (> 2 3/4 inches) then PVC will definitely be the way to go.
The last pricey item is the pump. Most people use powerheads to feed the skimmer. They can be had for about $20 mail order. You could use gravity to feed the skimmer, but then you would be a flow control on the input and some way of getting the water back into the tank (a DIY wet/dry filter would work :) ). Most powerheads have a flow control build in, so no external ball value will be needed, although it might be nice to have one.
[Forward to hoods, Back to wet-dry filters]
|
|
This page was last updated 29 October 1998 | ||