| [E-mail] | |||
The basic operation is that water flows from the prefilter to the bio-tower. The bio-tower, using a drip plate or rotating spray arm, spreads the water over a large area of bio media, which after time, contain nitrifying bacteria. Dispersing the water acts to aerate the water and denitrify it through contact with the nitrifing bacteria. The water drips through the bio media and collects in the sump. Carbon and buffers may be placed in the sump to aid in chemical filtration and long term stability.

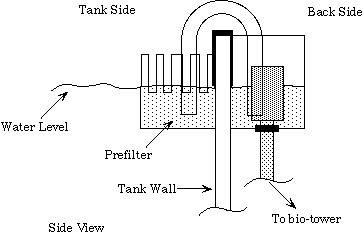
Figure 2.2.0 - Dual Overflow Box Prefilter
The advantage of the dual overflow construction is the way water flows to and from the W/D. With the pump in the sump, water is forced into the tank from the sump, which in turn overflows into the inner overflow box. The U-tube feeds the water to the outside box and back to the sump. Should there be a power outage or a pump failure, the water will only drain from the tank until the level drops below the inner overflow inlet grate and then the siphon will be broken. Once the siphon is broken, no more water will flow to the sump. If the sump has enough volume to compensate for the extra water, then no water will be spilled. Moreover, the entire tank's contents will not become part of the floor.
Construction of the overflow boxes require nothing more than a few pieces of acrylic and some acrylic bonding material. The general net.concensus is that actual acrylic welding materials are the best for this job, but any adhesive with says it bonds acrylic will work. The critical thing here is that the boxes do not leak. Waking to find a few inches of saltwater covering the floor and air-dried fishes is not a good thing. Appendix A contains exact plans for the construction of the overflow boxes.
It should be noted that the prefilter mechanism will be one of the few components that is visible. If you don't feel confident that you can produce a visually pleasing piece of art for the prefilter, a commercial prefilter is an acceptable choice. Good prefilters can be had for about $50 mail order.
There are various opinions about which method of dispersing the water is best, a drip plate or a rotating spray arm. A drip plate will clog with time, and a spray arm might stop rotating at times. A drip place can be cleaned and kept from clogging, so drip plates are used in these designs. They may very well be replaced with a rotating spray arm.

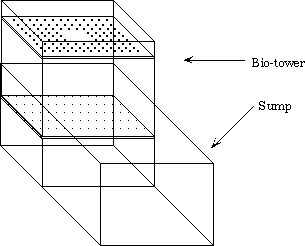
Figure 2.3.0 - Sump/Bio-Tower Configuration
The size of the sump is system dependent, but it should be large enough to hold all the water that will drain back into it during a power outage. The greater the sump space, the less the chance it will overflow during a power outage or if the pump fails.
As a general note, the bio-tower should sit a few inches above the water line, so the water can drip into the sump. Other filter material can be place under the bio-tower or in the direct flow path of the water as desired.
Next comes the bio-media. Once again there are two basic choices for media, DIY and commercial. Commercial bio-media costs about $10-$15 per gallon and looks like a spacecraft from a sci-fi movie. The DIY media can be just about anything you wish that has good surface area and won't collect a lot of detritus. Popular bio media include shotgun wadding, cut straws, packing peanuts, and Easter basket grass. Shotgun wadding is the most similar to commercial media in terms of size and shape, but the bacteria are not picky and don't care what esthetic value the media has.
What ever bio media is settled upon, be sure that it will not leach toxins into the water. Most plastics are safe, but some concern has been raised against colored shotgun wadding in that may be manufactured using recycled plastics and therefore have the potential to leach nasty chemicals into the water.
For the bio-tower, cut the bottom out of the trash can, leaving a 1/4 to 1/2 inch lip around the edge. Fit some "egg crate" over the hole to hold up the bio media. Fill the tower with whatever bio media is available.
Construction of the drip plate is not so easy, but certainly no stretch for a novice home improvement type. The drip plate must fit inside the bio-tower and the top should be flush with the top of the bio tower. Depending on the configuration of the tower, either a round or square drip plate can be made. Assuming tower is square (which is easier to build to), cut a square piece of acrylic plate that fits into the tower, but doesn't slide all the way down. If the piece slides, it will have to be supported with hooks, egg crate, or whatever is on hand (this is not critical). Take the plate and drill 1/16" holes spaced about 3/4" to 1" apart. Leave about a 1/2" border around the edge and about a 3" space in the middle in where no holes are drilled. Next cut some acrylic plates about 1 1/2" to 2" in height and the length of the drip plate walls. Build a box using the walls as such:

Figure 2.4.0 - Drip Plate Construction
The box acts to collect water and allows it to evenly drip through all the holes in the drip plate. The area in the center is where the water will enter from the prefilter and splash down onto the drip plate. You don't want the water to be forced through just the center, so there are no holes there to allow the water to collect and distribute. The drip plate should be constructed of at least 1/4" acrylic so that it won't sag in the middle and unevenly distribute the water. The thickness of the walls are not so important, but something too thin will cause problems when it comes time to glue it all together.
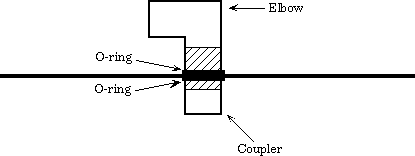
Next use another piece of acrylic plate to cover the drip plate (and the top of the bio-tower if desired). The plate should have a hole cut in the center where an elbow can be placed to connect the outlet hose from the prefilter, as shown in Figure 2.4.1. To plum the cover, use a PVC elbow and coupler which has a slip fitting on one end and a threaded fitting on the other (most commercial prefilters will come with an elbow and coupler). The coupler should screw into the elbow and fit tightly against the cover plate (use O-rings to ensure a good seal). Figure 2.4.2 shows the pluming.

Figure 2.4.1 - Drip Plate Cover

Figure 2.4.2 - Drip Plate Pluming
The cover should have some sort of rests or blocks on it to keep it from sliding around. The blocks should fit just inside the drip plate box and make a snug fit to keep the cover from pulling out easily. Additionally, the height of the drip plate box walls depend on the length of the coupler. You want at least an inch between the plate the coupler (you can cut the coupler if you want).
The final step is to put the cover on the drip plate and connect the hose from the prefilter to the drip plate cover. The size of the hose is not real critical, but it has to be larger than the return hose from the pump. 1 1/4" piping can be readily had at any hardware/home improvement store. Fashion the hose to the bulkhead of the prefilter and to the elbow of the drip plate cover. Make sure that the hose fits well and will not leak (hose clamps might be needed for this). As note, if this filter is intended for saltwater applications, all of the parts must be non-metallic.
Once the system is set up, test the drip plate and adjust the size of the holes to allow about 1" of water to collect. If the holes are too small the drip plate will overflow, if they are too large, it will run dry (running dry is better than constantly overflowing). Holes of about 5/16"e; to 7/16"e; will work nicely. Also, additional mechanical filter media can be placed over the drip plate for high quality filtration. 50 and 100 micron filter felt can be had from most mail order places.
	10 gallon tank		 7.00
	Acrylic Plates		 3.00
	5 Gallon Trash Can 	 2.50
	10 ft. of 1 1/2 hose	 5.50
	5/8" Return Hose (6 ft)	 4.00
	1 1/4" elbow & coupler	 0.63 each
	1 1/4" pipe (10 ft)	 1.20
	Commercial Prefilter	50.00
	Shotgun Wadding		15.00
	Hose Clamps - 		~1.00

	Total - 89.46
The price of the whole system will be about $160 including a decent sized pump (something like an Eheim 1250). You could save some money by building the prefilter from scratch. All the components for a good prefilter should be no more than $20, so the whole system would be about $130. In the long run, you will save about $65 dollars over a commercial unit and (to coin a phrase) achieve some sense of pride.
[Forward to skimmers]
|
|
This page was last updated 29 October 1998 | ||