| [E-mail] | |||
This document provides detailed instructions for building a 4-tube hood for a 4' long aquarium. The hood is light-weight but strong, it has a low profile and can be finished to meet your needs. The instructions aren't an easy read so take your time. It might take more than one sitting to get through the whole thing.
The hood assembly actually consists of two parts -- the hood itself and the ballast and wiring for the hood. The two parts will be described separately. The description is organized as follows:

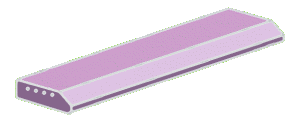
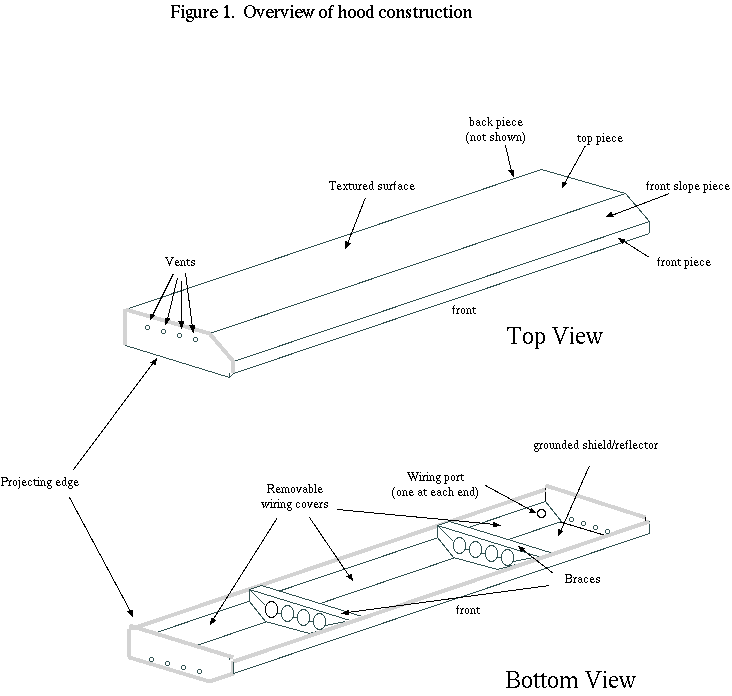
Figure 1 shows the general appearance and major features of the aquarium hood. The hood is build from 1/4" thick tempered particle board (masonite). The hood is 48 3/4" long and fits over the top of a 48" long aquarium. It is 10" wide and 2 1/2" tall. The hood is braced internally by two crossing braces each of which has two parts - a top and bottom. The braces also provide support for four T12 or T8 flourescent tubes. Wiring for the light is run behind removable covers at the rear of the hood that also serve as part of the reflecting surface. All internal parts of the hood are painted gloss white and the inside top and front slope of the hood can be lined with aluminum or (if a grounded shield is not required) with reflective mylar. Ventilation is provided by holes at the top of each end of the hood.
The hood is built mostly from 1/4" thick tempered particle board (masonite) and requires just over half of a 4' X 8' sheet. I built the hood with the textured side of the masonite out and the smooth side in for better reflection. In the table below, "inside" refers to the shiny side of the board and "outside" refers to the textured side. The hood requires only a few pieces, cut as follows (all dimensions in inches):
| Piece | Count | Size | Comment |
|---|---|---|---|
| Top | 1 | 8 5/16" X 48 3/4" | |
| Back | 1 | 2 1/4" X 48 3/4" | |
| Front slope | 1 | 2 7/16" X 48 3/4" | bevelled 45 degrees to inside |
| Front | 1 | 13/16" X 48 3/4" | |
| Wiring covers | 3 |
2 5/16" X 11 3/4" (2)
2 5/16" X 23 1/4" (1) | bevelled 45 degrees to the outside |
| Wiring cover brackets | 4 | 1 1/2" 45 degree triangles | cut from 2X2 or 2X4 pine |
| Ends | 2 | 2 1/2" X 9 1/2" | |
| Braces | 2 | 2 1/4" X 9 1/2" | used 3/4 inch plywood |
The hood might be made with more attractive wood veneer, but that would be more difficult; my experience with veneer is not encouraging. The internal braces were cut from 3/4" plywood, but would be better if cut from solid wood, probably a 1"X 3" or 1"X4" ripped down to the correct width.
The hood is held together mostly by screws that attach the long hood parts to the internal braces. Screws are also used to attach the wiring covers to the wiring cover brackets and to hold the top and bottom of the internal braces together, thus supporting the light tubes. The connectors and finishing materials used are shown below:
| Part | Number | Use |
|---|---|---|
| 1/2" #7 galvanized flathead screws | 12 | attach long hood parts to internal braces |
| 1/2" #10 galvanized roundhead screws | 4 | attach wiring cover to wiring cover brackets |
| 1 1/2" #8 galvanized flathead screws | 4 | attach top of internal braces to bottom of braces |
| white wood glue | a tube | connect end pieces to long hood pieces, wiring cover brackets to hood, and reinforce other joints |
| wood putty | a small can | fill all seams |
| medium and fine sand paper | as needed | smoothing the wood putty over joints |
| felt | 16 strips | pad between internal braces and light tubes |
| white gloss enamel spray paint | 1 can | all internal surfaces |
| white silicone seal | 1 tube | seal joints and edges of shield (if used) |
| other enamel spray paint | 1 can | exterior surface. Choose color to suite your taste. I used dark brown. |
| If a grounded shield is required | ||
| 10" wide aluminum flashing | 1 roll, about 6 feet | grounded reflective shield |
| epoxy glue | 1 pair of tubes | attach shield to hood |
| small bolt, nut and lock washer | 1 | electrical connection for ground wire |
The hood can be cut, shaped and assembled with a 7 1/2 " circular saw, a variable speed reversible drill (and bits to match), a saber saw or compass saw and a small collection of other tools (squares, chisels, rasps, clamps, screwdrivers and knives). A table saw would make the long cuts much easier. Bevelling the long edges of the front slope piece of the hood and the wire covers was my biggest problem. I initially tried cutting those parts at an angle with the circular saw, but that never worked and I finally shaped the bevels with a sureform. That job might better be done with a router or a table saw.
A large, uncluttered work space is needed for the first cutting and assembly steps -- I set up a 4'X4' work table in the middle of my garage. Sawing or shaping tempered particle board produces a lot of fine dust. Good ventilation may help avoid problems and I advise wearing a dust mask in addition to the usual eye protection.
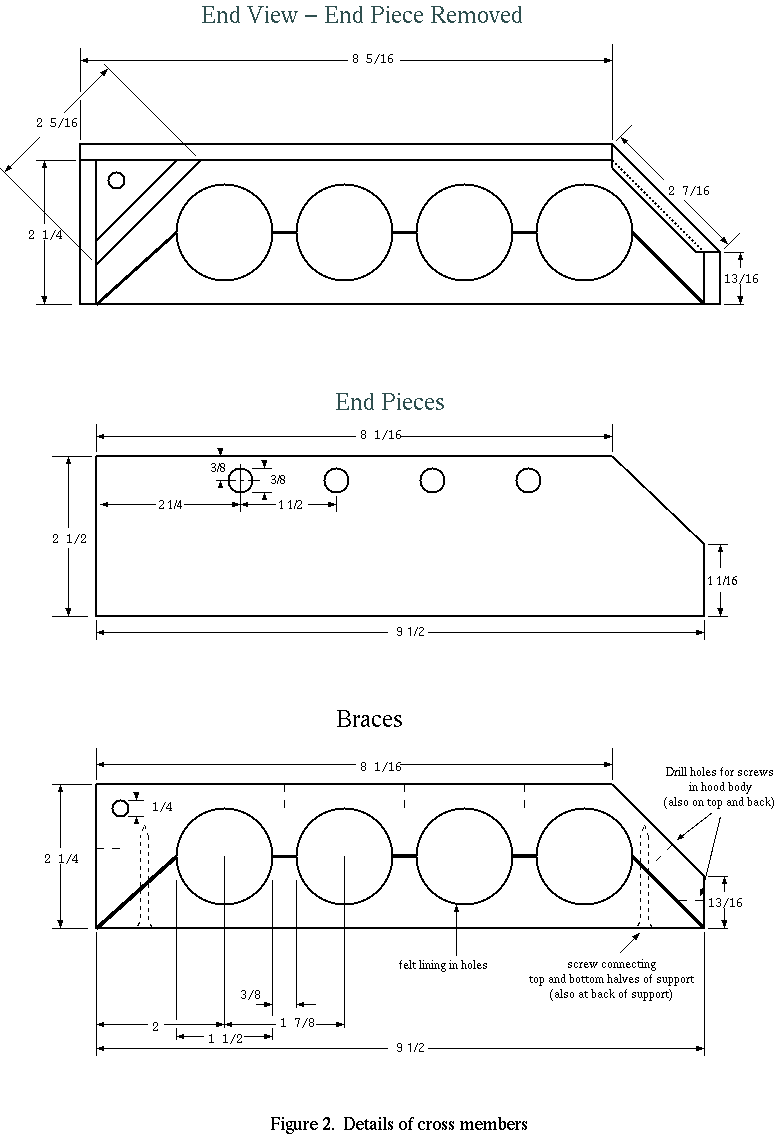
Internal braces Figure 2 shows details of the internal brace. Start with a 9 1/2" X 2 1/4" piece of plywood (or fine-grained solid wood, as plywood splinters easily). Mark the centerline of the piece at the locations shown for the large holes and drill the holes with a 1 1/2" auger or hole saw. Mark and drill the 1/4" hole at one corner (this is used to pass wires along the back of the hood, so the hole marks the top and back of the brace) and cut off the opposite corner on the same side to form the front slope of the hood; measure and mark 1 7/16" from the corner along both sides and cut across the corner at those marks.
Drill and counter sink a 1 1/2" hole in the bottom of the brace about half way from each end to the nearest hole. These holes are for the screws that will join the two halves of the brace.
Finally, use a saber saw (or other saw capable of starting in small spaces) to separate the brace into two parts. Cut from the centerline at the hole nearest one end of the piece toward the nearest bottom corner, then cut along the center line between each hole, and from the last hole to the other bottom corner. This separates the brace into two parts.
The 1 1/2" hole allows the hood to hold either T12 or (with inserts to adjust the hole size down to 1") T8 tubes. It is also possible to cut 1" holes and use only T8 tubes.
Once the braces are cut, they should be painted gloss white, and the felt strips should be glued to the inside of the holes.
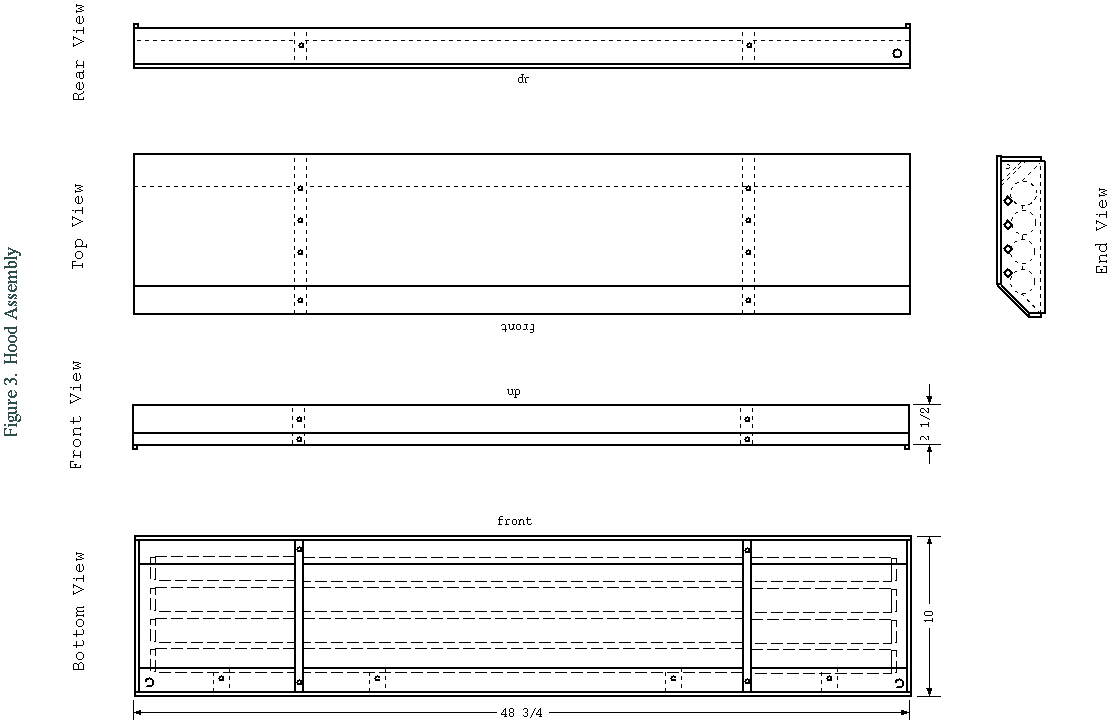
Front, front slope, top and back are assembled as shown in Figure 3. First, align all four pieces and mark two lines at the location of the braces. Locate each of the holes that will be drilled for screws connecting to the braces; the holes are centered across the front, front slope and back pieces and spaced evenly across the top piece. Finally, drill and counter sink each hole.
The back piece must also provide a hole for the cable from the ballasts. Drill a 3/8 inch hole in the back piece where ever you want the wiring to enter. For example, if you plan to run the wiring up the right side of the aquarium, drill the hole on the right side of the hood. For a more general case, you might drill the entry hole at the center of the back piece. It's also possible to put the cable entry point in the end of the hood, leaving the back clear.
Position the braces under the top piece in their correct positiions. The back of the top piece should overhanging the back of the braces by 1/4". Drill screw holes into the braces through the holes already drilled in the top piece. Connect the top piece to the braces with six 1/2" flathead screws. Repeat this process with the front piece, using two 1/2" flathead screws. Position the back piece and drill screw holes through it into the back of the braces, then run a bead of glue along the edge of the back piece and screw it in place against the back of the brace using two 1/2" flathead screws. Make sure the back piece is firmly joined to the top piece and wipe of excess glue. Finally, place the front slope piece against the brace. It shouldn't fit correctly
To fit the front slope piece correctly into the hood, it's necessary to cut shallow grooves across the inside of the front slope pieces where they meet the braces. A similar groove is needed to fit the front slope piece to the ends. I used a 3/4" wood chisel to cut the grooves, making them as deep as necessary to get the joints even. Check also the fit to the end pieces as this will also require some work to make a good fit. Once the grooves are cut position the front slope piece, drill the screw holes into the brace, run a bead of glue along both long edges and mount the front slope piece to the brace. Then wipe off excess glue. The front slope piece and the end pieces should be mounted in a single operation.
Ends Figure 2 shows the end pieces of the hood. The end pieces extend 1/4" below the front and back of the hood. That keeps the hood centered on the aquarium. The ends are fashioned from a 2 1/2" X 9 1/2" piece of tempered particle board. Remove one corner to match the front slope of the hood; measure and mark 1 7/16" from a corner along both sides, and cut across the corner at those marks. Drill four 3/8" holes along the top of the end pieces as shown in Figure 2 The holes provide ventilation and help prevent the buildup of heat and moisture inside the hood.
As an alternative to drilling the cable entry in the back piece, it can be drilled in the top rear corner of either end piece. That would allow the hood to be tilted back to rest evenly on its back piece while you work in the tank.
Fit the end pieces to the hood assembly. The end pieces should not fit correctly until you cut a groove in each end of the front slope pieces where they meet the ends. Cut the grooves before the front slope pieces are finally mounted to the braces. Apply water proof white wood glue to the back, top front slope and front edges of the end pieces and fit them to the hood. Tie or clamp the long pieces together to make firm contact with the ends and wipe off excess glue. The bottom edge of the end pieces should extend 1/4" below the front and back pieces of the hood. The end pieces complete the entire shape of the hood, so all pieces must be carefully positioned and the glue should be allowed to dry completely before continuing.
Wiring covers will fit at a 45 degree angle across the inside back of the hood, as shown in Figure 2 They provide a space to run the wiring and act as reflecting surfaces. There are three covers, two cover the area from the ends of the hood to the braces, and a third covers the area between the braces. Make sure the covers are cut to fit in the correct locations. The wiring covers are mounted on brackets with round head wood screws. Drill holes for the screws at the locations shown in Figure 3 -- at the center of the two small covers and 4 1/2" from each end of the long cover. The wiring must pass through the covers at either end of the hood to reach the light tubes. Drill 5/16" holes at the ouside end of the two outside covers to accomodate the wires. The inside of the covers should be painted gloss white, but you may want to wait until after the wiring cover brackets are in place before you paint the covers.
Wiring cover brackets are triangular pieces that fit to the joint between the top and back pieces. The wiring covers attach to the wire cover brackets. The brackets must be drilled to allow wires to pass lengthwise through the hood. The brackets can be cut from a 2" long piece of 2"X2" or 2"X4". The 2"X2" is cut corner-to-corner lengthwise into two 2" long triangular prisms. Drill a 1/4" hole lengthwise through each piece near the 90 degree corner, and cut the pieces in half, giving four triangular brackets. The procedure starting with a 2"X4" is only slightly different. It will probably be necessary to sand the brackets down for exact sizing. Put the brackets in place at the back of the hood and position the wiring covers to make sure the holes already drilled in the covers will match the bracket locations. Glue the brackets in place. After the glue is set, reposition the wiring covers and drill screw holes into the brackets through the existing holes in the covers.
Sealing Use wood putty to fill all joints from the outside of the hood. Take care not to fill the textured pattern of the masonite, or the putty will remain obvious after the hood is painted. The putty will add strength to the joints. After the putty is cured, sand the joints so they are as smooth and seamless as possible. Remove the braces from the inside of the hood and paint all interior surfaces gloss white. Be careful, as the hood will be relatively weak with the braces removed. After painting you can also apply white silicone sealant to the inside of the joints to help protect the joints from accumulated moisture. If you don't need to add grounded shielding or reflective material you can reinstall the braces after the paint is cured. It may be necessary to shape the top corners of the braces to fit them properly back into the hood.
Grounded shielding can be provided by lining the inside of the hood with aluminum flashing. With the braces removed, fit a piece of flashing to the inside of the hood. Mark and cut the flashing with a utility knife at the inside length of the hood - about 48 1/4". The flashing should extend under the wiring cover at the back of the hood so that the ground wire connection can be concealed behind the cover, but it doesn't need to extend all the way to the back of the hood. Crease the flashing into the bend between the inside of the top and the inside of the front slope . Be careful when creasing the flashing; it is weakened by too tight a crease and might break during handling. Mark the flashing at the bend between the inside of the front slope and the inside of the front and cut the flashing at the mark with a utility knife.
Once the flashing is cut and shaped to fit the hood mix and apply epoxy cement to the inside of the hood, then put the flashing in place. Clamp the flashing against the front slope and clamp it or weigh it down against the top to get a good bond. After the glue is set seal all edges of the flashing with white silicone sealant to prevent moisture from getting between the masonite and the flashing.
Drill a hole through the flashing and the top of the hood behind the wiring cover. The hole should accomodate a nut, bolt and lock washer used to connect the ground wire to the flashing. Also, locate all screw holes covered by the flashing and perforate the flashing at the holes. Reseat the braces and replace all screws. It may be necessary to shave the top of the braces to fit them properly back into the hood.
Nonconductive reflective material could be placed just like the flashing, or it can be applied to internal surfaces along with or in lieu of the gloss white paint. Omit the ground wire connection when using reflective mylar.
Exterior finish can be applied after the hood is assembled. I used several coats of dark brown enamel spay paint, making sure that no uncoated masonite remained. Any color and other types of finish would work.
The ballasts are probably the most expensive component of the hood assembly. The exact choice of ballast will determine the details of the ballast assemby and wiring. I used two electronic hybrid ballasts and details of the description that follows are specific to the ballasts I used. Your ballasts should come with wiring diagrams, wiring guidelines and specifications that will allow you to change this design to fit your needs. Follow the manufacturer's instructions as closely as possible.
I did not include a switch in the wiring of my hood; I run it entirely from a timer, so no switch was called for. You may want to add a switch to the power cord or too the power side of the ballasts. You can use multiple switches or double-throw switches to allow the ballasts to be powered independently. I have not allowed for dimmers or for switches that would control the lamps individually.
Select the ballasts you need to run the lights you want to use. Most ballasts will operate several different types and sizes of flourescent lights. The ballasts I used were each rated to run two 4' 34 watt or 3' 25 watt T8 bulbs,or two 4' 40 watt T12 bulbs. I used electronic hybrid ballasts because they provided high efficiency and cost less than electronic ballasts. In addition to the ballast you will need a variety of other hardware:
| Item | Count | Comments |
|---|---|---|
| 12" X 13" plywood board | 1 | Mounting board for ballasts and connectors |
| Power cord | 1 | Grounded, if the ballasts or hood require grounding |
| Insulated 18 AWG wire | 4 colors, 10 feet each in 3 colors and 6 feet in the color used for groundwire | Check the ballast specifications, 16 AWG wire might be needed |
| Terminal connectors | 2 or 3, depending on number of connections allowed | At least 2 terminals are needed, one for the power line and one or two for the lighting wires |
| Cable connectors | 4 | I used three 4-lead connectors and 1 single lead connector. This is optional. |
| Spiral cable wrapping and ties | I used a package of each | Your need will depend on the length of the cable you need to make, and on whether or not you include connectors |
| Butt connectors | 16 | used to make electrical connection to tubes |
| Aluminum flashing | 10" by about 18 inches | Used to make heat sink. Optional |
| Mounting screws and brads | as needed | Used to mount ballasts, terminal connectors and flashing to board. |
Wiring the hood isn't tool-intensive. You wil need at least a screwdriver, wire cutter and/or needlenose pliers, soldering iron and solder.
The ballast mount can be built with a heat sink. The hybrid electronic ballasts run pretty cool (actually, cooler than the light tubes), so the heat sink probably isn't needed.
It's convenient to wire the system so the hood can be disconnected from the ballasts. The cable from the terminal connectors on the ballast mount is about 3 feet long and runs to a set of male cable connectors. A second cable runs from a set of female cable connectors to the hood. The cable wired into the hood is about a foot long. When connected, the cable is four feet long. Disconnected, the hood can be moved without moving the ballasts. The cable connectors must be capable of handling the relatively high voltage (250 volts AC, in my case) supplied by the ballasts.
I wired the ballasts according to the manufacturer's diagrams, which required the ballasts to be completely independent of each other. It may be possible to wire some ballasts in parallel. In that case, the wiring could be considerably reduced.
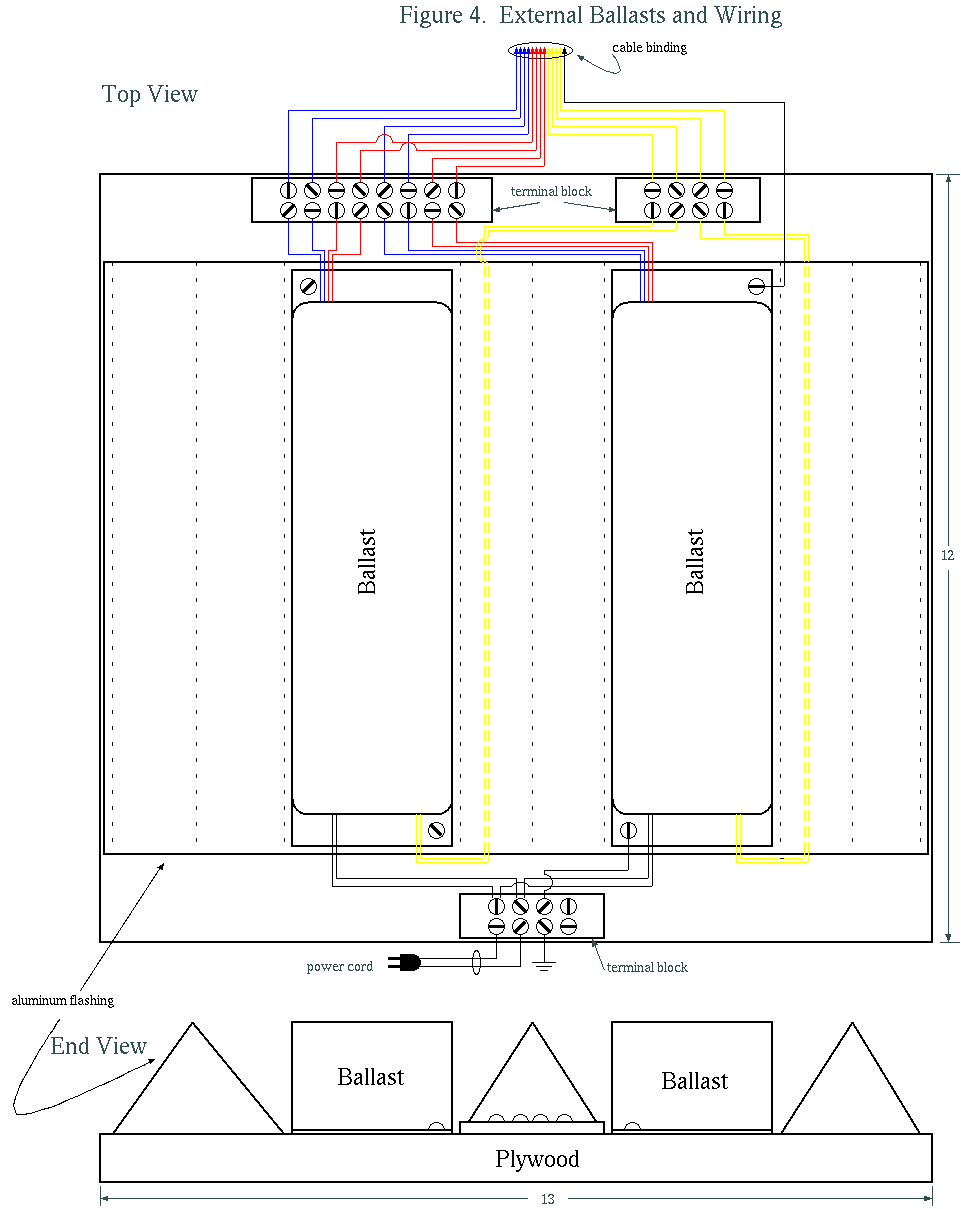
Ballast mount The ballast mount is shown if Figure 4. If you want to use the heat sink, use a ruler to fold the aluminum flashing as shown, and use brads to attach it to the plywood base. Position the ballasts, and attach the ballasts to the base using at least two screws for each ballasts. Position the terminal strips on the mounting board and attach them with wood screws.
Connect the power side of the ballasts to one terminal strip, and the light leads from the ballasts to the other terminal strip(s). Don't connect the power cord yet as it will make the mount more difficult to handle.
Cable The best solution to cabling the hood would be to find color-coded multiconductor cable with preinstalled connectors. Use those if you can find them - they'll simplify the wiring problem. If you can't find prewired cables, cut 13 lengths of wire each about 3 1/2' long - one for grounding and 4 in each of three colors for the lights. Strip about a 1/2" from one end of each wire and connect them to the terminal connectors on the ballast mount. Try to use colors that correspond to the colors used by the ballast manufacturer. Use cable ties to bind the wires together about 1 1/2" from the terminal strip. Use the spiral cable wrap to bind the rest of the length of wire into a single cable. Use cable ties to tie the wires off about 3" from the opposite end of the wires, and cut the spiral wrap at that point. The cable connector(s) will be attached here. Follow the instructions for whatever type of connector you choose. The connector I used could be attached to the wires without soldering. The solderless connections were entirely unsatisfactory and I had to go back and soldered each one.
Be very careful when placing wires in the connector. They need to be arranged so that a pair of wires that are supposed to supply one tube will remain paired in the connector.
Once the cable is completed connect the power cord to the ballast mount and set the whole assembly aside. It's done.
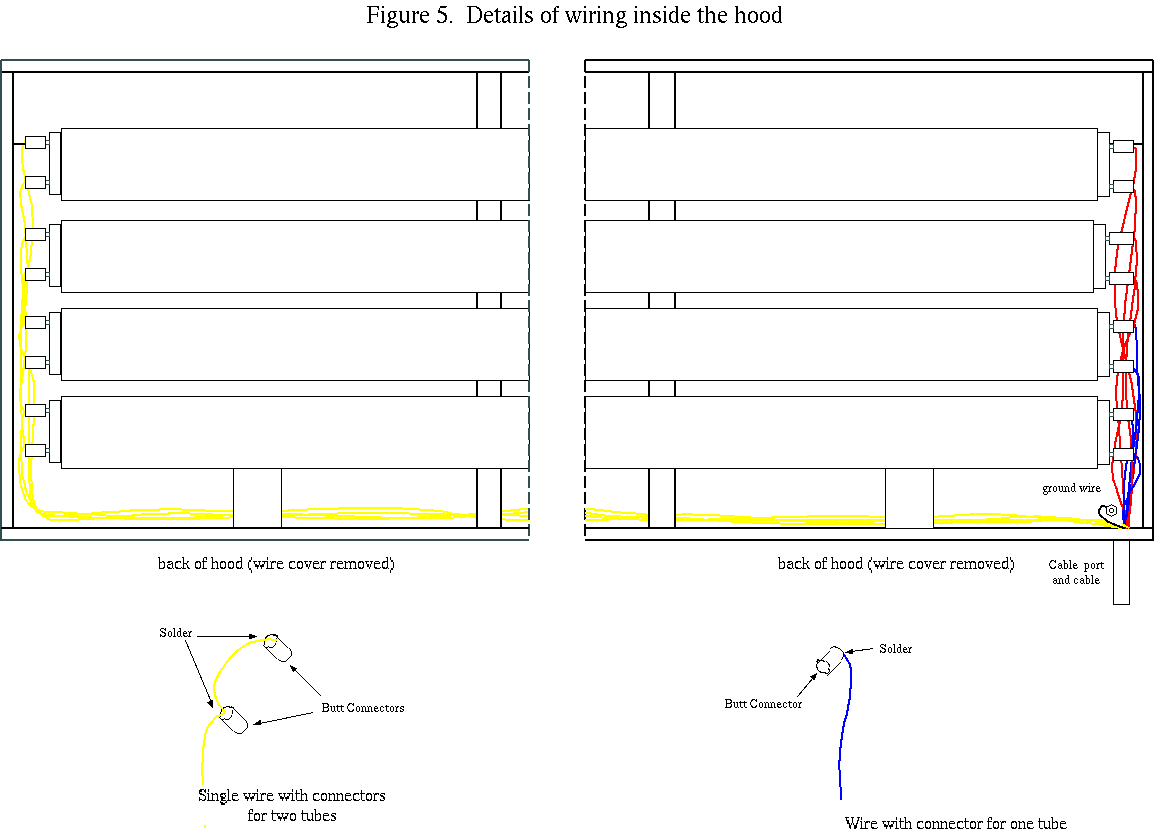
Hood wiring Figure 5 shows some details of the hood wiring. Lay the hood upside down and remove the wiring covers. Run the wires through the wiring port in the back of the hood, through the holes in the brace and wiring cover brackets and through the ports in the wiring covers. Lay the wiring out so there's plenty of wire to reach all of the light tubes, then bundle the wires with a cable tie just on the outside of the hood. You may also want to tie the wires together at a couple places inside the hood, but that isn't necessary.
Use the spiral cable wrap to bind the wires, forming a cable about 1' long. Use a cable tie to finish the wrapped section and cut the wires about 3" from the tie. Then add the cable connector, following the manufacturer's instructions. Make sure that the connectors join correctly to the cable from the ballast mount and that paired wires are correctly run to the hood.
Tube connectors The best light tube connector would be a waterproof endcap. I wasn't able to find waterproof endcaps at a reasonable price, so I proceded without them. The hood allows very little space for connecting the wires to the tubes and might need to be longer to accomodate endcaps. The best connector I came up with that would fit in that space was a wiring butt connector cut in half with the insulation cut away. The result is a split metal tube about 5/16" long and just big enough to fit snuggly over the prongs at the end of the tube. You may need to try a couple different butt connectors before you find the right size.
Place the lighting tubes into the hood and shorten the wires so that there is just enough wire remaining to reach the ends of the tube the wire will supply. Don't make the wires too short, or the tubes will be very difficult to put in and take out. I laid the wires out so that the ballasts operate alternate tubes. That way if only one ballast is operating the light distribution in the aquarium stays fairly uniform.
The ballasts provide four wires for the four connections at one end of the tubes and those wires all just end with a soldered connector. The ballasts provide only two wires for the four connections at the opposite end, so each wire must connect to two tubes. The wires are soldered into connectors to serve the first tube, and then additional wires are soldered into the same connector to run to the second tube.
I left the connectors in my hood uninsulated. It might be possible to cover the connectors with heat shrink insulation or to lacquer the connectors.
The ground wire connects to the bolt provided for grounding the reflective shield. No special arrangements are necessary, but special connectors made for attaching wires to bolts. You can use one to provide a neater and more dependable connection.
Finish up and trouble shoot Replace the wiring covers inside the hood, then place the lighting tubes into the braces, connect the wires and secure the tubes into the hood. Plug the cable from the hood into the cable from the ballasts and plug the ballasts into a wall outlet. If the wiring is all completed according to the manufacturers instructions, then you should have a working hood. Enjoy.
If not....
First, make sure that you have followed manufacturer's instructions at every possible turn, then look for other problems.
I found that troubleshooting problems was tough. I had two problems. First, one of the (brand new) lights was defective and the mismatch to the other tube on the same ballast made both tubes slow to start. After a few days they stopped lighting altogether. That wasn't a problem with the wiring, but it made the real problems hard to find. The cable connectors I used were rated just at 250 volts and if the prongs of the connector were even slightly out of position the connector arced and the tubes flickered or wouldn't light. I had to rewire the connectors severals times before I got everything assembled so that the connectors made full contact and didn't arc.
I was very careful when I layed out the wiring - particularly the connectors - that pairs of wires would remain paired throughout the wiring harness. If you don't do that you might have a lot of problems that could be hard to identify. As in most electrical assemblies, a little extra care at the beginning can save you a lot of trouble later.
Many thanks to Harold Pachtman for his helpful review of this document.
Roger S. Miller|
|
This page was last updated 29 October 1998 | ||